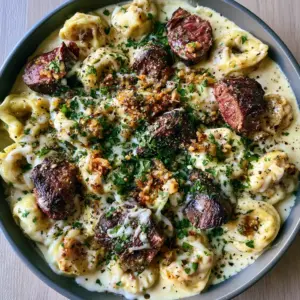
The Coconut Chicken Rice Bowl is the ultimate intersection of vibrant tropical flavors and comforting, creamy textures. Imagine a handcrafted speckled ceramic bowl filled to the brim with fluffy grains of jasmine rice and succulent, golden-seared chicken.
This recipe isn’t just about taste; it is a visual feast featuring a glossy, pale-orange sauce that clings to every morsel of protein. Each bite is punctuated by the sharp heat of red Fresno chiles and the citrusy brightness of fresh lime zest.
Whether you are looking for a high-protein weeknight dinner or a stunning meal-prep option, this Coconut Chicken Rice Bowl delivers restaurant-quality aesthetics with home-cooked soul. Let’s dive into how you can achieve that perfect handheld smartphone photo aesthetic in your own kitchen.

Why You Will Crave This Vibrant Tropical Chicken Bowl
- Visual Contrast: The striking combination of bright green cilantro, paper-thin red chiles, and snow-white coconut flakes creates a professional food blogger look.
- Textural Harmony: Experience the crunch of toasted coconut against the silky, glossy coconut lime sauce and tender, individual grains of steamed rice.
- Complex Flavor Profile: A balanced symphony of creamy coconut, acidic lime, savory seared chicken, and a subtle heat that lingers on the palate.
- Efficiency: This dish comes together in under 40 minutes, making it one of our favorite
for busy professionals.
Pantry Essentials for the Ultimate Creamy Sauce
To achieve the specific “pale-orange” hue and glossy texture described in our visual blueprint, we must select high-quality fats and aromatics. These ingredients are the building blocks of a dish that looks as good as it tastes.
Chicken Breast Cubes: 1.5 lbs (680g) of boneless, skinless chicken breast provides a lean, succulent base that takes on a beautiful golden-brown sear. High heat is essential here to trigger the Maillard reaction for depth of flavor.
Full-Fat Coconut Milk: 1 can (400ml) of premium coconut milk ensures the sauce is thick and luxurious. Avoid “light” versions, as they lack the viscosity needed for that glistening, glossy finish.
Red Curry Paste: 1 tbsp (15g) is the secret to the pale-orange tint and a layer of complex spice. It provides the pigment that transforms white coconut milk into a vibrant, appetizing sauce.
Jasmine Rice: 1.5 cups (300g) of dry jasmine rice creates a fragrant, fluffy foundation. Steaming it correctly ensures individual grains that won’t clump under the weight of the sauce.
Red Fresno Chiles: 2 chiles, sliced paper-thin, offer a mild-to-medium heat and a pop of brilliant red color. They are less aggressive than serranos but more flavorful than standard red bell peppers.
Toasted Coconut Flakes: 1/4 cup (15g) adds a nutty crunch and a visual element of “high-end” plating. Always toast them fresh for the best aroma and texture.
Lime Zest and Juice: The zest of 2 limes provides the “visible specks” in the sauce, while the juice adds the necessary acidity to cut through the richness. Fresh lime wedges are a non-negotiable garnish for those glistening juice droplets.
Avocado Oil: 2 tbsp (30ml) is used for searing the chicken due to its high smoke point. This ensures you get a golden-brown crust without the oil breaking down and smoking out your kitchen.
Fresh Cilantro: 1/2 cup (15g) of roughly chopped cilantro adds a garden-fresh aroma. Its bright green hue is the perfect color-theory foil to the pale-orange sauce.
The Tools You Need for Culinary Perfection
Achieving the perfect Coconut Chicken Rice Bowl requires more than just ingredients; it requires the right equipment for texture and presentation. A heavy-bottomed skillet is your most important ally here.
A cast-iron or stainless steel skillet is ideal for achieving those succulent, golden-brown seared chicken breast cubes. These materials hold heat exceptionally well, ensuring the chicken sears rather than steams.
You will also need a microplane for grating the lime zest into fine, delicate shards. For the rice, a dedicated rice cooker or a heavy-lidded pot will ensure the grains remain individual and fluffy.
Step-by-Step Guide to the Perfect Golden Sear
Preparing the Jasmine Rice Foundation
Rinse 1.5 cups (300g) of jasmine rice under cold water until the water runs clear to remove excess starch. Combine with 2.25 cups (540ml) of water and a pinch of salt in a pot; bring to a boil, then simmer covered for 15 minutes.
Once the water is absorbed, remove from heat and let it sit, covered, for another 5 minutes. This “resting” phase is what creates the individual, fluffy grains seen in our visual blueprint.
Achieving the Golden-Brown Chicken Crust
Pat your 1.5 lbs (680g) of chicken cubes dry with paper towels to ensure a proper sear. Season generously with kosher salt and black pepper, which will appear as visible specks in the final sauce.
Heat 2 tbsp (30ml) of oil in your skillet over medium-high heat until it shimmers. Add the chicken in a single layer, leaving space between cubes; sear for 3-4 minutes per side until a deep, golden-brown crust forms.

Crafting the Pale-Orange Glossy Coconut Sauce
Reduce the heat to medium and add 1 tbsp (15g) of red curry paste to the skillet, stirring for 60 seconds until fragrant. Pour in 1 can (400ml) of full-fat coconut milk, scraping the bottom of the pan to release the flavorful browned bits.
Stir in the lime zest and a squeeze of lime juice, allowing the sauce to simmer for 5-7 minutes. The sauce will reduce slightly, becoming thick, glossy, and a beautiful pale-orange color that coats the back of a spoon.
Assembling Your Masterpiece: Garnishing for Visual Impact
To replicate the authentic food blogger aesthetic, start by filling one half of a speckled ceramic bowl with a bed of fluffy jasmine rice. On the other side, pile the chicken cubes high, allowing the sauce to pool slightly around the rice.
Drizzle extra sauce over the chicken so it looks glistening and succulent. Top the dish with a heavy hand of freshly chopped cilantro and a scattering of paper-thin red Fresno chile slices.
Finally, sprinkle the toasted coconut flakes over the center and place a fresh lime wedge on the rim. Squeeze a tiny bit of juice over the chicken just before serving so the glistening droplets are visible to your guests.
Expert Tips for Success
- Dry the Protein: If the chicken is wet, it will steam instead of sear. Use paper towels to remove every bit of moisture before it hits the hot oil.
- Don’t Crowd the Pan: Sear the chicken in batches if necessary. Crowding the pan drops the temperature, resulting in grey, rubbery meat rather than golden-brown cubes.
- The Gloss Factor: If your sauce looks too thin, whisk in a slurry of 1 tsp (5g) cornstarch and 1 tsp (5ml) water. This will create that professional, glossy “sheen” instantly.
- Toast the Coconut: Watch the coconut flakes closely in a dry pan over medium heat. They turn from white to golden-brown in seconds, so stay focused!
Storage, Reheating & Freezing
The Coconut Chicken Rice Bowl is an excellent candidate for meal prep. Store the chicken and sauce in an airtight container for up to 4 days in the refrigerator.
When reheating, add a splash of water or extra coconut milk to the sauce. This prevents the sauce from breaking or becoming too thick during the heating process.
While the chicken and sauce freeze well for up to 3 months, we recommend making fresh rice upon serving. Frozen rice often loses the “fluffy grain” texture that makes this bowl so satisfying.
What to Serve With This Tropical Delight
This bowl is a complete meal on its own, but it pairs beautifully with other vibrant dishes. If you are hosting a tropical-themed dinner, consider serving it alongside a
for a surf-and-turf experience.
For those who love a variety of bowl-style meals, this recipe sits perfectly alongside our
. To wash it all down, a cold glass of
provides the perfect tart contrast to the creamy coconut sauce.
Frequently Asked Questions
Absolutely! Chicken thighs are more forgiving and stay very juicy. Just ensure you sear them long enough to develop a deep golden-brown crust for the best flavor and texture.
The pale-orange hue is achieved by blooming 1 tablespoon of red curry paste in the pan before adding full-fat coconut milk. This provides both the vibrant color and a subtle depth of flavor.
It has a mild-to-medium heat. The red curry paste adds a background warmth, while the fresh Fresno chiles on top provide a sharper kick. You can deseed the chiles to reduce the heat significantly.
Place them in a dry skillet over medium heat and shake the pan constantly. As soon as they turn golden and smell nutty (usually 1-2 minutes), remove them from the pan immediately to stop the cooking.
Clumping is usually caused by excess starch. Make sure to rinse the dry rice under cold water until the water runs clear, and always allow the rice to rest, covered, for 5 minutes after cooking.
The Ultimate Coconut Chicken Rice Bowl Recipe Card

Coconut Chicken Rice Bowl: A Creamy 30-Minute Tropical Masterpiece
Ingredients
Equipment
Method
- Rinse jasmine rice until water runs clear. Combine with 2.25 cups water and a pinch of salt. Bring to a boil, then cover and simmer for 15 minutes. Let rest for 5 minutes before fluffing with a fork.
- Pat chicken dry and season with salt and pepper. Heat oil in a large skillet over medium-high. Sear chicken cubes for 3-4 minutes per side until golden-brown and cooked through. Remove and set aside.
- In the same skillet, add curry paste and cook for 1 minute. Whisk in coconut milk, lime zest, and lime juice. Simmer for 5-7 minutes until the sauce is glossy and thick.
- Return the chicken to the skillet and toss to coat in the pale-orange sauce.
- Divide rice into bowls. Top with the coconut chicken. Garnish with sliced Fresno chiles, chopped cilantro, and toasted coconut flakes. Serve with an extra lime wedge.
Notes
Use full-fat coconut milk for the most luxurious, glossy sauce texture.
Closing & Call to Action
The Coconut Chicken Rice Bowl is more than just a quick dinner; it is a sensory experience that brings tropical warmth to your table. The combination of golden-seared chicken and that signature pale-orange sauce is guaranteed to become a new family favorite.
If you made this recipe and loved the visual results, please leave a comment below and let us know! Don’t forget to follow us and save this recipe to your boards on Pinterest for your next meal planning session.