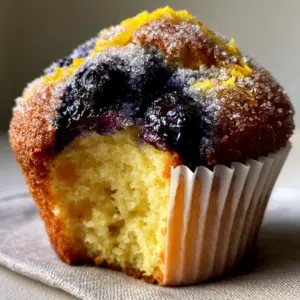
There is a specific kind of magic that happens when you break open a warm, thick cookie to reveal a hidden, molten surprise. These Cheesecake Stuffed Chocolate Chip Cookies are the pinnacle of indulgent home baking, designed to replicate that high-end, artisan bakery aesthetic right in your own kitchen. Imagine a cookie with a rich golden-brown exterior, rippled with crinkly edges, and studded with glistening, half-melted semi-sweet chocolate chunks.
As you pull the cookie apart, the heavy, dense dough gives way to a brilliant white, perfectly set cheesecake center. This isn’t just a cookie; it’s a structural masterpiece that balances the saltiness of the dough with the tangy, creamy sweetness of a chilled cream cheese core. Finished with a delicate sprinkle of flaky sea salt, every bite offers a symphony of textures that will keep your guests coming back for more.
Why These Stuffed Cookies Are a Total Game-Changer
- The Contrast of Temperatures: The warm, buttery dough wraps around a cool, dense cheesecake filling for a unique mouthfeel.
- Bakery-Level Aesthetics: We utilize a specific folding technique to achieve those sought-after crinkly, rippled tops seen in professional pastry shops.
- The Perfect Snap and Chew: By using a combination of sugars and a hint of cornstarch, we ensure a soft center with a crisp, golden-brown edge.
- Visual Glistening: Large semi-sweet chocolate chunks are strategically placed to melt into pools of cocoa goodness under the heat.

The Science Behind the Perfect Golden-Brown Cookie Dough
To achieve the specific visual result described in our blueprint—a thick, bakery-style cookie—we have to look at the chemistry of our fats and sugars. We start with unsalted butter that is softened but not oily, which allows us to aerate the dough during the creaming process. This creates the structural integrity needed to hold a heavy cheesecake center without collapsing in the oven.
We use a higher ratio of brown sugar to granulated sugar. Brown sugar contains molasses, which is acidic and reacts with baking soda to create lift, while also contributing to that deep, rich golden-brown color. If you are looking for more sweet inspiration, check out our peach cobbler cinnamon rolls for another twist on classic comfort flavors.
Essential Ingredients for the Signature Crinkle
Unsalted Butter (1 cup / 226g): Provides the fat base; ensure it is at room temperature to properly emulsify with the sugars for a stable crumb.
Light Brown Sugar (1 cup / 200g): The secret to the chewy texture and the caramelized, golden-brown hue of the baked exterior.
Granulated Sugar (½ cup / 100g): Essential for the crisp, rippled edges that give the cookie its professional, crinkly appearance.
All-Purpose Flour (2 ¾ cups / 345g): The structural backbone of the cookie; measured precisely to prevent the dough from spreading too thin.
Cornstarch (1 tsp / 3g): A professional baker’s secret that keeps the cookie thick and soft, preventing it from becoming overly crunchy.
Building the Brilliant White Cheesecake Filling
Full-Fat Cream Cheese (8 oz / 225g): Must be brick-style cream cheese to ensure the filling is thick and opaque, not runny.
Powdered Sugar (¼ cup / 30g): Adds just enough sweetness while maintaining the brilliant white color and a smooth, set texture.
Pure Vanilla Extract (1 tsp / 5ml): Enhances the floral notes of the cream cheese without tinting the filling yellow.
The Finishing Touches
Semi-Sweet Chocolate Chunks (1 ½ cups / 255g): Large chunks provide those glistening, melted pools of chocolate visible in our visual blueprint.
Flaky Sea Salt (to taste): The final touch that catches the light and cuts through the richness of the cheesecake.
Professional Tools for a Flawless Bake
To achieve the “handheld smartphone photo” quality of a perfect bake, you need the right equipment. A heavy-duty stand mixer or hand mixer is vital for creaming the butter and sugar until they are light and fluffy. You will also need rustic parchment paper, which prevents sticking while providing that classic kitchen aesthetic.
A large cookie scoop (about 3 tablespoons) is non-negotiable for ensuring every Cheesecake Stuffed Chocolate Chip Cookie is uniform in size. Finally, a wire cooling rack is essential to stop the cooking process immediately, preserving the “perfectly set” nature of the cheesecake center. For those busy days, you might also enjoy our collection of quick and easy recipes that use similar pantry staples.

Step-by-Step Instructions to Master the Stuffing Technique
Step 1: Preparing the Stabilized Cheesecake Core
In a medium bowl, beat the chilled cream cheese, powdered sugar, and vanilla until smooth. Use a small spoon to drop teaspoon-sized mounds onto a tray lined with parchment paper. Freeze these for at least 30 minutes; this is critical to ensure the filling stays opaque and doesn’t leak during the baking process.
Step 2: Creaming for Structure and Color
Cream the room temperature butter with both sugars for at least 3-5 minutes. You are looking for a visual change: the mixture should turn pale and fluffy. Add the eggs one at a time, followed by the vanilla, ensuring each is fully incorporated to create a strong emulsion.
Step 3: Folding the Dough and Chocolate Chunks
Whisk together the flour, cornstarch, baking soda, and salt. Slowly add the dry ingredients to the wet, mixing until just combined. Fold in the large semi-sweet chocolate chunks by hand, ensuring they are evenly distributed so that every cookie has that “glistening” look.
Step 4: The Stuffing Process
Take a large ball of dough (about 2 tbsp) and flatten it into a disk in your palm. Place a frozen cheesecake cube in the center, then wrap the dough around it, sealing all seams. Roll it into a ball, making sure no white filling is visible before it goes into the oven.
Step 5: Baking for the Perfect Rippled Texture
Place the cookies on a parchment-lined sheet, spaced 3 inches apart. Bake at 350°F (175°C) for 12-14 minutes. Watch for the sensory cues: the edges should be a deep golden-brown and the tops should have a rippled, crinkly texture. Immediately upon removing from the oven, sprinkle with flaky sea salt while the chocolate is still glistening.
Expert Tips for Success
- Don’t Skip the Freeze: If the cheesecake filling isn’t frozen solid, it will melt into the dough, and you’ll lose that “brilliant white” center.
- The Bang Method: For extra crinkly edges, gently bang the cookie sheet on the oven rack halfway through baking to collapse any air pockets.
- Chunk Placement: Press a few extra chocolate chunks into the top of the dough balls right before baking for a more professional look.
- Room Temp Ingredients: Ensure your eggs and butter are at room temperature to avoid curdling the dough, which affects the final rise.
How to Store and Reheat Your Masterpiece
Because these Cheesecake Stuffed Chocolate Chip Cookies contain cream cheese, they should be stored in an airtight container in the refrigerator for up to 5 days. The cold temperature actually helps the cheesecake center stay dense and fudgy. If you prefer them warm, a quick 10-second zap in the microwave will make the chocolate chunks glisten again.
For long-term storage, these cookies freeze beautifully. You can freeze the unbaked stuffed dough balls for up to 3 months. When the craving hits, simply bake them from frozen, adding 2-3 minutes to the total baking time.
What to Serve with These Decadent Cookies
These cookies are incredibly rich, so they pair perfectly with something refreshing. A glass of cold milk is the classic choice, but for a summer gathering, consider serving them alongside our refreshing triple berry lemonade. If you are hosting a full dinner, these make a grand finale after a meal of coconut chicken rice bowls.
Frequently Asked Questions
Absolutely. You can store the stuffed, unbaked dough balls in the fridge for 24 hours or in the freezer for up to 3 months before baking.
You can, but large chunks are recommended for that ‘bakery-style’ look. Chunks melt into larger, glistening pools compared to standard chips.
Yes, because the filling is made with real cream cheese, these cookies should be stored in an airtight container in the refrigerator for food safety.
The ripples come from a combination of using both brown and white sugar and properly creaming your butter. You can also ‘bang’ the pan on the oven rack to help them settle.
Leakage usually happens if the filling wasn’t frozen solid before assembly or if the dough wasn’t sealed tightly enough. Ensure you pinch the seams of the dough together firmly.
The Ultimate Cheesecake Stuffed Chocolate Chip Cookies Recipe
Cheesecake Stuffed Chocolate Chip Cookies: The Ultimate Bakery-Style Guide
Ingredients
Equipment
Method
- Beat cream cheese, powdered sugar, and vanilla until smooth. Drop teaspoon-sized mounds onto parchment and freeze for 30 minutes until solid.
- Cream butter and both sugars until light and fluffy (3-5 mins). Add eggs and vanilla, mixing until fully incorporated.
- Whisk flour, cornstarch, baking soda, and salt. Gradually add to wet ingredients, then fold in chocolate chunks.
- Flatten 2 tbsp of dough, place frozen cheesecake in center, and seal tightly. Roll into a ball.
- Bake at 350°F (175°C) for 12-14 minutes until edges are golden-brown and tops are crinkly. Top with sea salt immediately.
Notes
Use large chocolate chunks for the best visual 'glistening' effect.
Share Your Baking Results!
We can’t wait to see your thick, bakery-style creations! These Cheesecake Stuffed Chocolate Chip Cookies are designed to be the star of your next dessert spread. If you enjoyed this recipe, please leave a comment below and let us know how your crinkly tops turned out. Don’t forget to save this recipe to your favorite boards on Pinterest so you always have it on hand!