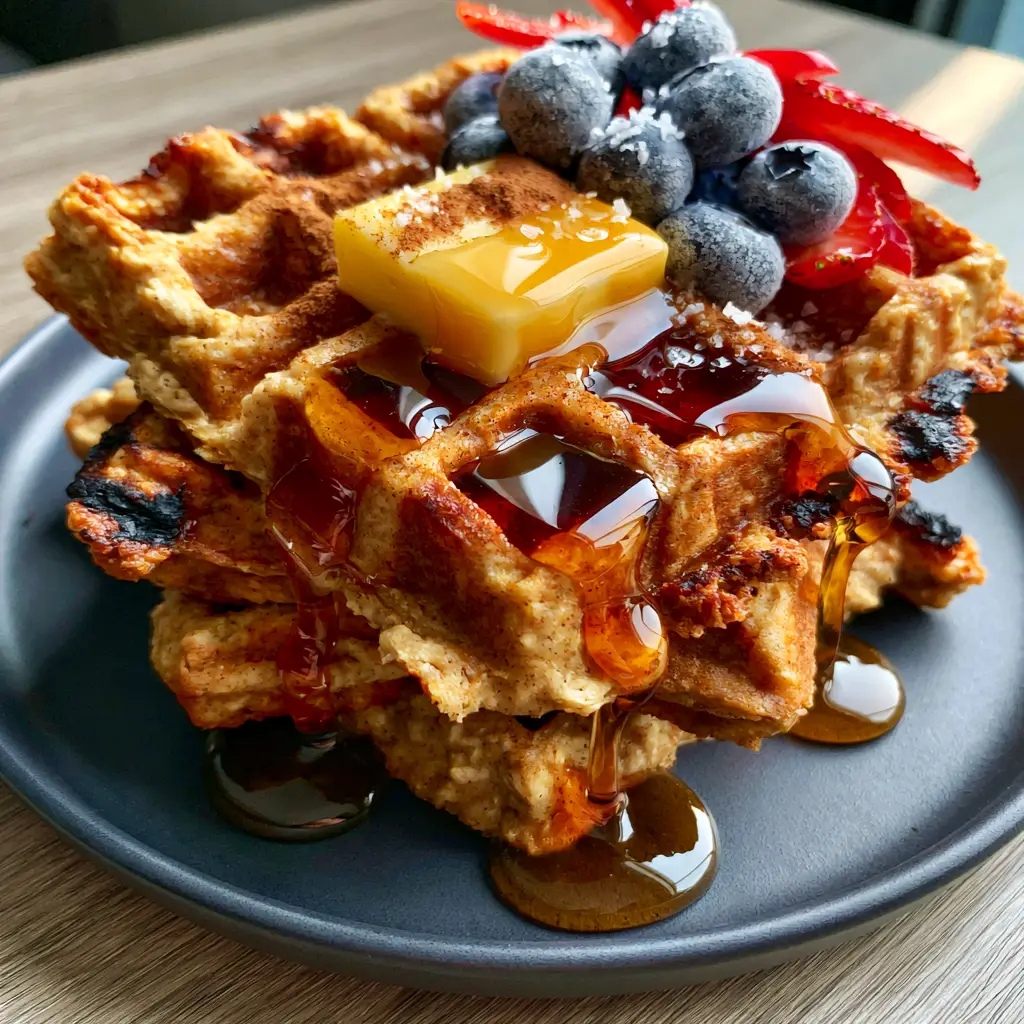
There is nothing quite like the aroma of fresh oat flour waffles wafting through a sun-drenched kitchen on a Saturday morning. These aren’t your typical gluten-free substitutes; they are a premium breakfast experience characterized by deep, recessed wells and a rustic, grainy texture that holds up to the heaviest pours of maple syrup.
Imagine a stack of four thick Belgian-style waffles, each featuring visibly crunchy, charred edges that provide a satisfying snap with every bite. The interior remains tender and airy, thanks to the unique structural properties of finely ground oats.
In this guide, we will walk through the culinary science required to achieve that perfect golden-brown finish. From selecting the right grass-fed butter to the final dusting of flaky sea salt, every detail is designed to create a restaurant-quality meal in your own home.
The Unmatched Appeal of Homemade Oat Flour Waffles
- Unrivaled Texture: The oat flour provides a nutty, toasted flavor profile and a rustic crumb that wheat flour simply cannot replicate.
- Crispy Charred Edges: Using a high-heat Belgian iron creates those iconic “burnt” sugar edges that contrast beautifully with a soft center.
- Visually Stunning Garnish: Topped with vibrant red strawberries, dusty-blue blueberries, and a glistening amber syrup for a Pinterest-perfect presentation.
- Naturally Wholesome: These waffles are packed with fiber and complex carbohydrates, keeping you fueled longer than traditional white flour versions.
Essential Ingredients for the Perfect Waffle Batter
To achieve the visual and textural results described in our blueprint, we must use specific ingredients that react together under high heat. While the oat flour is the star, the supporting cast is just as vital.
Oat Flour (2 Cups / 240g): This provides the foundational “grainy” texture seen in the cross-section of the waffle. You can use store-bought or blitz-rolled oats in a high-speed blender until they reach a fine, flour-like consistency.
Baking Powder (2 tsp / 10g): This is your primary leavening agent, responsible for the “thick” Belgian lift. It creates the air pockets that allow the syrup to pool in the deep wells.
Ground Cinnamon (1 tsp / 5g): Beyond flavor, cinnamon aids in the browning process. It provides that warm, mahogany hue seen in the golden-brown crust.
Fine Sea Salt (1/2 tsp / 3g): This enhances the sweetness of the maple syrup. We will also use flaky salt at the end, but this fine salt seasons the batter from within.
Large Eggs (2): The proteins in the eggs provide the structure needed to prevent the waffles from crumbling. They act as the “glue” for the gluten-free oat particles.
Whole Milk or Buttermilk (1.5 Cups / 360ml): The acidity in buttermilk reacts with the baking powder for extra lift. If using regular milk, the waffles will be slightly more “crispy” and less “cakey.”
Melted Unsalted Butter (1/4 Cup / 56g): Fat is the conductor of heat. This ensures the edges of the waffle “fry” against the iron plates, creating the charred effect.
Vanilla Extract (1 tsp / 5ml): A foundational aromatic that bridges the gap between the nutty oats and the sweet toppings.
The Finishing Touches: Toppings and Garnishes
A great waffle is defined by its toppings. To match our visual blueprint, you will need high-quality additions that provide contrast in color and temperature.
Grass-Fed Butter: Look for a deep yellow, high-fat butter. A large square pat placed on the hot stack will begin to melt into the wells, adding a rich, creamy element.
Viscous Maple Syrup: Use Grade A Amber or Dark syrup. Warm it slightly before pouring to ensure it flows in those “slow, heavy droplets” down the sides of the stack.
Fresh Berries: You will need a handful of plump, dusty-blue blueberries and thinly sliced vibrant red strawberries. These provide a fresh, acidic pop against the dense waffle.
Flaky Sea Salt & Cinnamon: A final dusting of these two ingredients provides a “finishing touch” that hits the palate immediately, highlighting the sweet-and-salty dynamic.
Tools Required for Thick Belgian Wells
You cannot achieve this specific look with a standard thin waffle maker. You need a Belgian Waffle Iron with deep grids to create the “wells” for the syrup to occupy.
A Fine Mesh Strainer is also recommended for that “very fine dusting” of cinnamon at the end. For the batter, a simple Balloon Whisk and a Large Mixing Bowl will suffice, as we want to avoid over-aerating the oat mixture.

Step-by-Step: Crafting Your Oat Flour Waffles
1. Prepare the Oat Flour Base
In a large bowl, whisk together the 2 cups (240ml) of oat flour, baking powder, cinnamon, and fine salt. Ensure there are no clumps of leavening agent, as this can cause uneven rising and bitter spots in the final product.
2. Emulsify the Wet Ingredients
In a separate vessel, whisk the 2 eggs until the yolks and whites are fully integrated. Stream in the 1.5 cups (360ml) of milk and the melted butter, whisking constantly to ensure the butter doesn’t solidify into chunks if the milk is cold.
3. The “Hydration Rest” Technique
Combine the wet and dry ingredients. Stir until just combined. Now, let the batter sit for 5 to 10 minutes. This “hydration rest” allows the oat flour to absorb the liquid, ensuring the waffles are moist inside and don’t feel “sandy.”
4. Searing for Charred Edges
Preheat your waffle iron to its highest setting. Lightly brush the plates with oil or butter. Pour the batter into the center, allowing it to spread nearly to the edges. Close the lid and cook until the steam stops, then wait an additional 30 seconds for those signature charred edges.
5. Plating and Visual Assembly
Stack four thick waffles on a matte charcoal-grey ceramic plate. Place a square pat of grass-fed butter in the center. Pour the viscous syrup slowly, allowing it to overflow the wells. Arrange the strawberries and blueberries artistically around the butter, then finish with a dusting of cinnamon and a pinch of flaky sea salt.
Expert Tips for High-Altitude and High-Crunch Results
- Check Your Steam: The most reliable sensory cue for a finished waffle is the steam. When the visible steam dissipates, the exterior has set and the moisture has evaporated enough to create a crunch.
- The Oven Rack Trick: If you are making a large batch, don’t stack them on a plate immediately or they will lose their charred edges to residual steam. Place them on a wire rack in a 200°F (95°C) oven to keep them crispy.
- Consistency Check: Oat flour batter thickens as it sits. If your last few waffles are too dense, whisk in 1 tbsp (15ml) of milk to loosen the batter back to a pourable state.
- Don’t Peek: Opening the iron too early will tear the delicate oat structure before it has set. Wait at least 3 minutes before checking for doneness.
Storage, Reheating, and Meal Prep
If you have leftover oat flour waffles, let them cool completely on a wire rack. Store them in an airtight container in the refrigerator for up to 3 days.
For long-term storage, flash-freeze the waffles in a single layer before transferring them to a freezer bag. They will keep for up to 2 months. To reheat, skip the microwave! Use a toaster or a 350°F (175°C) oven to restore the “crunchy” exterior and charred edges.
What to Serve with Your Waffle Spread
While these waffles are a meal on their own, they pair beautifully with other breakfast staples. If you love a variety of textures, try serving these alongside strawberry overnight oats for a chilled contrast.
If you want to lean into the warm spice profile, these are the perfect companion to cinnamon-spiced waffles for a brunch buffet. For a savory twist that turns breakfast into dinner, pair them with hot honey chicken—the oat flour base provides a sturdy foundation for the spicy honey drizzle.
If you prefer a more traditional route, look at our classic fluffy waffles guide to see how wheat-based recipes compare in texture and lift.
Frequently Asked Questions
Yes! Simply pulse rolled oats in a high-speed blender until they reach a fine, flour-like consistency. Be sure to measure the flour after blending, not before.
Yes, melted coconut oil works as a 1:1 substitute. However, you will lose the specific savory-sweet profile provided by the grass-fed butter mentioned in the blueprint.
Increase the temperature of your waffle iron and add a tablespoon of maple syrup or sugar to the batter. The sugars caramelize against the high heat to create that dark, crunchy rim.
Oats are naturally gluten-free, but they are often processed in facilities that handle wheat. If you have Celiac disease, ensure you buy oats certified as gluten-free.
Soggy waffles are usually caused by an iron that isn’t hot enough or by stacking them immediately after cooking. Ensure your iron is preheated to high and cool waffles on a wire rack.
The Final Recipe for Crispy Oat Flour Waffles
Oat Flour Waffles: The Ultimate Guide to Crispy, Golden-Brown Bliss
Ingredients
Equipment
Method
- Whisk oat flour, baking powder, cinnamon, and fine salt in a large bowl.
- In a separate bowl, whisk eggs, milk, and melted butter until emulsified.
- Combine wet and dry ingredients and let rest for 10 minutes to allow the oats to hydrate.
- Cook in a preheated Belgian iron on high heat until steam stops and edges are charred.
- Stack 4 waffles, top with grass-fed butter, warm syrup, berries, extra cinnamon, and flaky salt.
Notes
Use a high-heat setting on your waffle maker to get those crispy, charred edges.

Closing & Call to Action
Mastering the art of the oat flour waffles is a rewarding journey into gluten-free baking that doesn’t compromise on flavor or texture. The combination of charred, crispy edges and the rich, melted grass-fed butter creates a sensory experience that is truly second to none.
If you made this recipe, we want to see your results! Leave a comment below with your favorite toppings or share your photos on Pinterest to inspire other home cooks. Don’t forget to subscribe to our newsletter for more deep-dives into culinary science and restaurant-quality recipes.